January 5, 2012

The holidays

It's been awhile since I updated. Christmas and New Years are over. I can't believe it's all ready 2012 -- if the Mayans have their way, we have just celebrated our last new years!

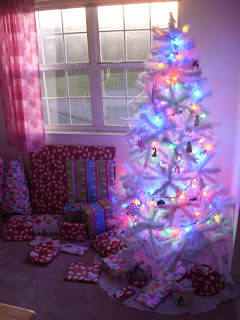
Here is a 2-picture recap.


Christmas was fantastic. The husband loved his presents. He uses his laptop desk every day (I will post a tutorial and pictures for this -- I promise!). I made canvas pictures for my Mother-in-law to hang in the vacation house she and Father-in-law are building. They both loved the pictures and requested more canvas pictures for their new house. So, all in all, a complete success. (And I loved my gifts, too. Have to mention this because I know you're reading it!).


New Years day, husband and I built this bookcase. We used Ana-White's plans, with the slight adaptation of not nailing in the shelf dividers so we can move them around and adjust whenever and however we want. It needs to be painted but I'm torn between a seafoam green and a pretty cream. Husband is pushing to stain it because he likes the look of wood. We will see...

New Years Eve was a complete bust. We paid $80 + tip for dinner in a new restaurant. When we got there, it was complete chaos and it turns out there are no waitors. We had to get our raw meat (Husband had a steak and I had the salmon) on a styrofoam plate and grill it ourselves on this giant charcoal grill. I was wearing awesome heels, so my feet were killing my by the third trip downstairs for getting my salad, grilling my entree, getting my sides, getting my drink, getting dessert, etc. We ended up just leaving about an hour after we got there and spent the rest of the night at home cuddling up and watching a movie. We actually missed midnight by a few minutes! It was worth it, though. :)

November 29, 2011

Project: No crap on the ground

My fabric stash has always been a mess. it seemed to me that there was no good way to store it so that I could see what I had and still access it easily (stacking just led to half the pile falling over, baskets made it hard to see, etc). I went black friday shopping and got a killer deal on a comforter and sheets. After I washed my finds, I was digging through my fabric and I had an idea.
I grabbed the empty, plastic, zippered bag that my comforter came in and I folded my fabric and added it. It was easy to see. The piles were small (no falling over!). It was easy to use. It was water proof. It zipped to keep it all together. it would slide into a corner, under a table, under my bed! It was perfect!

I grabbed the smaller version that my sheets came in and put my scrap stash in it. It's been working perfectly for me. I can't believe I didn't think of this sooner!


Christmas Present #1

My husband is the hardest person to buy Christmas presents for. He has very few things that he actually wants so when there is something that peaks his interests, he just buys it for himself. But alas, I am determined to come up with something. He needed a little notebook or note pad to carry around with him and keep track of his daily to-do lists. Instead of just getting a boring old notebook, I spruced it up by making it like the notebook featured in a movie we watched together last Christmas: Death Note.

I forgot to take a picture before I wrapped it up, but the inside says "This journal belongs to" and I wrote in "Shinigami Ryuk" (a reference to the movie that fans will be able to appreciate).


The notebook is about 6 inches tall and cost $6 at Walmart. I used white acryllic paint to free-hand the writing. It's far from perfect, but I think that adds to it -- it look slike a Shinigami would have sprawled it quickly and carelessly.

October 4, 2011

T-Shirt Pillows

                This project is great because it’s super easy and really cheap. It’s so easy that it doesn’t really require a tutorial, but I made one anyway just because I love tutorials (and I remember what it was like when I was learning to do artsy things and I know a lot of seemingly self-explanatory tutorials were very helpful). So T-shirt pillows were invented in my classroom 2 years ago when most of my students forgot their rest-time pillow on a regular basis. Many of the pillows stayed in my classroom, but some went home to sit on their beds or couches to display the fine art work of the little learners. This time, I am making them as a fun get-to-know-you activity for the kids I will be babysitting.


Things you will need:
Plain white t-shirt (I used Fruit of the Loom size ‘Small’)
Filling (I used poly-Fil)
Glue gun
A couple pins (not required but will make things a little easier)
Decorating supplies (Ribbon, fabric markers, sequences – anything you want)

Step 1:
Lay your shirt flat on your work surface. You don’t need to iron because the shirt will be so stretched out that it won’t matter.

Step 2: The front collar will hang below the back collar. Pull it up and glue the middle together. (See the picture below.)


Step 3:
Glue the rest of the collar and the two sleeves.


Step 4:
You will want to get a fist-full of your filling and stuff it into each sleeve before you stuff anywhere else. At this point, use more than you think you will need.


Step 5:
Fill the rest of the pillow and then pin the bottom. If it doesn’t look how you would like, unpin it and add more/less.

Step 6:
Starting in the middle, glue the bottom and remove the pins as you go.


Voila, you’re all done. Add kids and decorate.  If you have older kids, you could even share these directions with them and let them make it themselves -- and, of course, if you know your way around a sewing machine you could turn it inside out and sew the openings then turn it and top stitch on the right side (but then it wouldn't be no-sew!). 

 Here is the t-shirt pillow my kids helped me make in our classroom).


September 17, 2011

Bedroom Renovation: Headboard

Today, Jason and I spent a total of 2 hours and $41.00 on a headboard that I absolutely LOVE. After a little bit of coercion and promising my wonderful husband that this would not be a complete disaster, he agreed to try it. We probably spent three times as long deciding on a fabric as we did on everything else combined (I wanted something fun that would not look too childish and Jason finally just told me to get what I liked because who cares if other people think it's childish? So I did). I could not believe how easy it was, and if I could do it then you can too!

And so here is my tutorial, complete with pictures.


Before and After

1)      1) Measure the size you want your headboard to be. If you have trouble with this, try putting painters tape on the wall to give you an idea of how it will look, then just measure the tape! Mine was three feet tall (36 inches) and 5 feet 1 inch long (61 inches) for a queen bed. It should extend to the bottom of your mattress (I’ll talk about this later).

2)      2) Measure how far off the ground you want it to be. This can be a rough estimate. Mine was about a foot from the bottom of my mattress to the floor. Add this height to the height of your headboard from step 1 (so mine was 12 inches off the floor and my headboard from 36 inches high. My 2x4s were approximately 43 inches.)

Assemble the supplies!

You will need:
*A piece of plywood or particle board  that is ¾ inch thick (I used particle board)
Price: $20.00
*Two 2x4s cut to the estimate you got in step 2.
Price: $2.00
*A Staple gun (I used half-inch staples).
Price: Free (If you don’t have one, you can buy them for about $10.)
*A mattress pad (I used a full size from Walmart. Get the egg-crate type, not the feather type.)
Price: $10.00
*Fabric of your choice (I used 2 yards and it was the perfect size.)
Price: $9.00 from Hobby Lobby
*Drill (I used 2 inch screws)
Price: Free (These can be kind of pricey but if you don’t have one or can’t borrow one, you rent them from Home Depot.)
*A small level (This isn’t 100% necessary, just makes things a little easier.)
Price: Free (You can buy them pretty cheaply at Home Depot.)

Total Price: $41.00

3)      3) Now that you have everything, congratulate yourself. You’ve done the hard part (and the long part – choosing fabric took us 3x longer than making the headboard!).

4)      4) The nice people at Home Depot cut our particle board and 2x4s for me. The first 2 cuts are free and each additional cut is $0.25. If you prefer to cut it yourself, then get your wood cut.

5)      5) Lay the board down and put your fabric on top to make sure it’s going to fit. You should have at least 3 inches on each side. Iron the fabric.


6)      6) Now move the particle board and lay the mattress pad face up on the ground.

7)      7) Lay the particle board on top of it.


8)      8) On the long side, pull the mattress pad up and stable it down about an inch from the edge. Stop 6 inches from the corner.

9)      9) Repeat step 8 on the other long side (do not do the short sides yet).
1010)   Now do one corner. For these, you want to give it a wrapped Christmas present look. I did quite a bit of trimming, and it is easiest of you staple one layer then staple another on top of it. Once this is done, staple the rest of the long side (you should have left about 6 inches unstapled in step 8 to make it easier to pull the corners).

1111)   Once you’ve stapled all four corners, staple the short sides in the same way you stapled the long sides. Trim off any extra foam. Now, your head board should look something like this:


1212)   Pick up the board and lay your fabric wrong side up. This means the part of your fabric that has the design on it should face the ground and the back side should face up.

1313)   Lay the board on top of the fabric the same way you did with the mattress pad.

1414)   On a short side, put one stable in the middle and staple across (it is okay to staple through the foam but it may be easier to staple directly onto the particle board).

1515)   On the other short side, pull the fabric as tight as you possibly can and put a staple in the middle again. While pulling the fabric as tight as possible, staple across the short side and stop 6 inches from each corner.


1616)   Now staple all four corners the same way you did with the foam.

1717)   It should look something like this:


1818)   Congratulations, the headboard part is done! Now all you need to do is attach the legs!

1919)   Take those 2x4s and hold them against your mattress and mark where the bottom of your mattress is with a pencil (the level is helpful here to make sure they’re straight).

2020)   Line that pencil line up with the bottom of one of the long sides and screw them into place. I used four screws in each one but that is not a magic number. Jason thought it would be best to be sure they wouldn’t move.


2121)   Now lift it up and admire your work! Looks good, doesn’t it? Almost done! (if you see any wrinkles, don’t worry – you can steam them out. If your fabric puckered, you can play around with it and get it straight. I’m not a perfectionist so it was good enough for me!)


2222)   Put the 2x4s flat against the wall behind your bed.  Push the mattress against the head board so the headboard is sandwiched between the mattress and the wall. And you’re done! 

A couple notes…

You can staple the mattress pad and the fabric at the same time. However, I did them separately so that I can take out the staples that are holding the fabric on and add a new one if I get bored of this one. I love versatility.

You can screw the 2x4s in before you upholster it. However, I intentionally did it this way so that I can take them off when I move. Also, this way is easier to re-upholster later.

You can add scotchguard to make sure it doesn’t get stained.

You want to make sure you have at least 3 inches of fabric on each side because if you  pull it too tightly then the fabric can tear. 

There are a lot of things you can use instead of a mattress pad. This made mine really soft. Way softer than I would have thought. But, you can also use batting, carpet padding, or any combination of these things.

You can upholster the 2x4s to match, but I didn’t care that much since you can’t see them.
September 15, 2011

Door decor


                I wanted to make a tulle wreath for Halloween. I started to, and then I decided that I hated it so I trimmed off all the “fluff”. Surprisingly, I actually kind of like the “hair-cut” version; I like the thin stripes on top and the thick ones on bottom. The whole process was easy and took about an hour and a half in front of the television, so I decided on a photo tutorial for anyone who is interested. And I apologize about the final pictures, I realize the shadows are horrible! Enjoy.

*Edit: The picture only shows one roll of black tulle, but I used three. The pattern is four pieces of black tulle, one green, four black, one orange, lather, rinse, repeat. : )


September 12, 2011

A place for everything

 When we moved in here 4 months ago, the pantry had been converted into an awkwardly-placed closet. Someone took out all the shelves and added a bar to hang coats on. Since we have a nice, little foyer for our coats and shoes (stay tuned for the renovation pictures of that!), I knew this strange, misplaced little closet would have to be changed back into a pantry. In the chaos of moving in, I put a metal bookcase-like rack in the closet. In the subsequent months, it was completely overflown with miscellaneous stuff that wouldn’t fit in the cabinets. Enough was enough.

                Here is my $9.00 DIY shelving:

                First, whoever took out the original shelves had left in the siding that held them up. Weird, right? So I measured all the way across the back (30 inches) and up the side to the length I wanted (18 inches).

                Jason and I set out for Home Depot, where the nice people there cut a piece of plywood into five 18x30 inch rectangles for me. The plywood cost $8.00 and the cutting cost $1.00 (they charge after the first 2 cuts – still, for $0.25 a cut, it was well worth it!). So we had spent $9.00.

                When I got home, I put the shelves in and they fit perfectly but… Well, they were ugly. So I went to my fabric stash and found some extra fabric, I pulled out my hot glue gun and I went at it.

                First, I lay the fabric on the board. Then I pulled it under the ledge and glued it on. Then I pulled it tight and glued it to the opposite side. Finally, I glued the sides. Easy peasy.


Half-way done!
                
                 I put all the shelves in place. I used all different fabrics because 1) it’s what I had laying around and 2) I just like how bright it is this way. You could even sew together a few fabrics if you don’t have one piece that’s big enough.

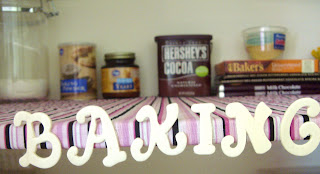
                I went into my craft room and dug out some wooden letters from our wedding. I glued them to the front of the shelves accordingly .Voila, a completely organized, new, pretty, inexpensive pantry!


 I did not nail the shelves to the ledges at all so I can take them out and recover them if I get bored of the fabric. I also put our board games on the floor under the bottom shelf so they’re out of the way yet handy when we want them.

 All finished, with most of the food back in.


                I didn’t think to take a “before” picture, mainly because I didn’t expect to like it this much. It definitely suits our life much better – Jason can’t complain that he can’t find anything anymore.
But, what do you think?


Close-up of the baking shelf.