Here is my $9.00 DIY shelving:
First, whoever took out the original shelves had left in the siding that held them up. Weird, right? So I measured all the way across the back (30 inches) and up the side to the length I wanted (18 inches).
Jason and I set out for Home Depot, where the nice people there cut a piece of plywood into five 18x30 inch rectangles for me. The plywood cost $8.00 and the cutting cost $1.00 (they charge after the first 2 cuts – still, for $0.25 a cut, it was well worth it!). So we had spent $9.00.
When I got home, I put the shelves in and they fit perfectly but… Well, they were ugly. So I went to my fabric stash and found some extra fabric, I pulled out my hot glue gun and I went at it.
First, I lay the fabric on the board. Then I pulled it under the ledge and glued it on. Then I pulled it tight and glued it to the opposite side. Finally, I glued the sides. Easy peasy.
Half-way done!
I put all the shelves in place. I used all different fabrics because 1) it’s what I had laying around and 2) I just like how bright it is this way. You could even sew together a few fabrics if you don’t have one piece that’s big enough.
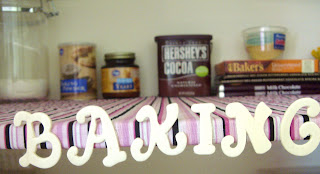
I went into my craft room and dug out some wooden letters from our wedding. I glued them to the front of the shelves accordingly .Voila, a completely organized, new, pretty, inexpensive pantry!
I did not nail the shelves to the ledges at all so I can take them out and recover them if I get bored of the fabric. I also put our board games on the floor under the bottom shelf so they’re out of the way yet handy when we want them.
All finished, with most of the food back in.
I didn’t think to take a “before” picture, mainly because I didn’t expect to like it this much. It definitely suits our life much better – Jason can’t complain that he can’t find anything anymore.
But, what do you think?
Close-up of the baking shelf.


No comments:
Post a Comment